How to Use a Tire Machine: A Step-by-Step Guide for Safe Operation
Tire machines have revolutionized automotive maintenance by simplifying tire changes and ensuring both precision and safety. They help protect tires and rims from unnecessary wear while saving time and effort. Whether you are a seasoned technician or a newcomer to tire maintenance, knowing how these machines work is a key skill for effective tire care.
Hofmann is a leader in the tire equipment industry offering innovative solutions designed to make tire changes more efficient and error free. Our technology helps protect your tires and wheels, providing peace of mind for both professionals and hobbyists.
In this guide, we will break down everything you need to know about tire machines including the types available, their main components, and step-by-step instructions for safe & effective operation. You'll also find tips for avoiding common mistakes, ensuring technician safety and keeping your equipment in peak condition.
What is a Tire Machine?
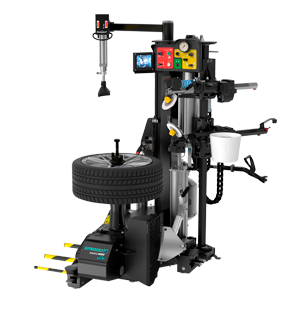
A tire changing machine is a specialized tool used to remove or install tires on wheels with accuracy and ease. It securely holds the wheel in place and uses mechanical components to handle the tire, minimizing manual labor and reducing the risk of rim or wheel damage. This makes it an essential tool for tasks like tire replacement or repair.
By speeding up the tire changing process and improving precision they ensure tires are installed safely and correctly. Selecting the right machine for either occasional use or high volume work can make all the difference in achieving reliable results.
Types of Tire Changers
Different tire changers are designed to handle specific tire types and volumes. Understanding their features helps you choose the most suitable option.
Swing Arm Tire Changer
Known for its durability and straightforward design, the swing arm model is a staple in smaller garages or for personal use. Its horizontally moving mounting arm makes it ideal for standard tires and compact operations, offering reliable performance for a variety of tasks.
Tilt Back Tire Changer
Tilt-back models feature a mounting arm that moves backward to allow greater clearance for larger tires. This type is particularly efficient in high-volume settings, making it popular in professional shops that handle a wide range of vehicles.
Leverless (Touchless) Tire Changer
Leverless tire changers employ advanced technology to avoid traditional tire irons, reducing the risk of scratching alloy or specialty rims. These machines are perfect for servicing high-end vehicles or performance cars, ensuring safe and precise handling of delicate or premium wheels.
Heavy-Duty Tire Changer
Designed to handle the unique challenges of large commercial vehicle tires, heavy-duty tire changers are indispensable for working on trucks, buses and industrial equipment. Their robust construction and powerful motors make it easier to manage the size and weight of substantial tires. For shops that frequently service heavy vehicles these machines are a critical investment that boosts efficiency and reliability.
Motorcycle Tire Changer
Specifically designed for motorcycle wheels, these machines provide the precision required to accommodate smaller rims and unique tire profiles. They prevent damage to motorcycle tires and rims, ensuring a smooth process for specialty repair shops or enthusiasts.
Key Components of a Tire Changer
Understanding the key components of a tire changer helps operators work more effectively and safely.
-
Bead Breaker: The bead breaker applies precise force to loosen the tire’s bead from the rim. This step is essential for protecting the wheel and tire from unnecessary damage. Proper use of this tool sets the stage for a successful tire changing operation.
-
Bead Assist: This component provides additional leverage to guide the bead over the rim, especially useful for low-profile or stiff tires. It reduces physical strain while improving accuracy and safety.
-
Bead Depressor: The bead depressor keeps the tire bead securely in the wheel's drop center during removal or installation. This allows the tire to move freely providing the slack needed for smooth operation. It minimizes the risk of errors while ensuring the process is more efficient and controlled.
-
Turntable: The turntable is the platform where the wheel is clamped securely. Its rotation allows for smooth and controlled movement during the tire changing process, enabling precise mounting or dismounting.
-
Mounting Arm: The mounting arm supports the demount head, which guides the tire bead over the rim. Depending on the tire changer machine type, the arm may swing into place or tilt back for better access, ensuring smooth and damage-free operation.
-
Inflation System: The inflation system ensures the newly mounted tire is brought to the recommended pressure. With a built in pressure gauge and safety features it helps operators avoid overinflating which could compromise the tires integrity.
Step-by-Step Guide on How to Use a Tire Machine
Operating a tire machine with care and precision is essential for a safe and efficient tire-changing process. Follow these steps to ensure a smooth operation from start to finish.
Step 1: Prepare the Tire and Rim
Start by giving the tire and rim a thorough cleaning to remove any dirt, debris, or stuck materials. Carefully check for visible damage, like cracks in the rim or punctures in the tire. Addressing these issues before you begin ensures a smoother and safer process.
Step 2: Break the Bead
Remove the valve stem core to release the air. Position the tire and wheel assembly in a vertical position between the tire changer housing and the side shovel (bead breaker). The valve stem with TPMS should be positioned at 12 o’clock to prevent damage while breaking the bead. Place the shovel on the side of the assembly where the tire bead meets the rim. Activate the bead breaker and apply pressure until the bead separates from the rim. Roll the assembly to the 6 o’clock position and repeat the process. Perform the same procedure on the inner tire bead.
Step 3: Position the Tire on the Machine
Place the wheel on the turntable of the tire changer, making sure it’s perfectly centered. Use the clamps to hold the wheel securely in place. Double-check the alignment to avoid putting uneven pressure on the rim during the operation, which could lead to unnecessary damage. Alloy wheels should always be clamped from the outside edge of the rim. Steel wheels can be clamped from inside or outside depending on their finish.
Step 4: Remove the Tire
Engage the mount, demount head to the edge of the rim and lock in place. The locking mechanism will automatically set a small clearance between the rim and demount head. Position the TPMS at 11 o’clock in relation to the mount demount head. Place the tire tool between the mount demount head and the tire bead, not contacting the rim. Pry the bead over the demount head while holding the tire bead in the rim drop center on the opposite side of the assembly. Activate the turntable in a reverse direction to relieve the tension on the tire tool. The tool can now be removed easily, preventing damage to the rim. Activate the turntable to rotate the wheel as you gently guide the bead over the rim using the demount head and mounting arm. Maintain steady control to prevent damage to the tire or wheel. Completing this step carefully ensures a seamless transition to the next phase.
Step 5: Install the New Tire
Start by rotating the TPMS to a location approximately 180 degrees away from the mount demount head. Lubricate both beads of the tire with tire mounting lubricant. Position the new tire’s lower bead onto the mount demount head and then onto the rim to the right on the mount demount head. Rotate the turntable to install the lower bead. With the TPMS in the 180 degree position again, set the upper bead onto the mount demount head with the tire’s bead again to the right of the head. Use the bead assist and the bead depressor (if equipped) to guide the second bead over the rim. Take your time to ensure the tire is seated evenly, reducing the risk of imbalances or air leaks.
Step 6: Inflate the Tire
Unclamp the assembly from the turntable. Attach the inflation system to the valve stem and inflate the tire until both beads have seated (40psi / 2.76 bar MAX). When the beads have seated, remove the inflator and install the valve core. Reconnect the inflator and Keep an eye on the pressure gauge as the tire fills, making sure to stop at the manufacturer’s recommended level. Overinflating the tire can weaken its structure, so take your time and monitor carefully.
Common Mistakes to Avoid When Using a Tire Machine
Mistakes during the tire-changing process can lead to inefficiencies or even damage to the equipment and tires. For example, overinflating the tire is a common issue that can weaken the tire's integrity. Always stick to the recommended pressure levels and use a reliable gauge to monitor the process.
Another frequent error is improper wheel positioning. When the wheel isn’t centered and securely clamped, it can result in uneven pressure and potential damage. Double-check alignment and ensure the wheel is firmly in place before starting. Clamping mistakes, such as using inside clamps instead of outside ones, can damage rims or fail to secure the wheel properly. Refer to the machine’s guidelines for the correct clamping method to prevent issues.
Positioning the bead improperly is another pitfall. The bead should rest in the drop center of the rim to provide necessary slack for easier removal or installation. Ignoring this can cause unnecessary tension and damage. Bead mismanagement during removal or installation is also common. Ensure the bead feeds correctly over the demount tool and onto the rim to avoid slipping beneath the mount demount head, which can lead to tears in the bead or gouges in the rim.
For machines with adjustable speeds, use slower speeds during high-stress moments, such as the final placement of the bead over the rim edge. This reduces the risk of damage and provides better control. By staying vigilant and addressing these common mistakes, operators can ensure smoother, safer tire-changing processes while protecting both the equipment and the tires.
Safety Tips for Operating a Tire Machine
Operating a tire machine requires strict attention to safety protocols to protect yourself and ensure the process runs smoothly. Here are some essential safety practices:
-
Wear Proper Protective Gear: Always wear safety glasses to shield your eyes from debris and gloves to protect your hands. Closed-toe, non-slip footwear is vital for stability and shielding your feet from heavy objects.
-
Inspect the Machine Before Use: Before operating, inspect the tire machine for wear or damage. Check that all components, such as the bead breaker and turntable, are functioning properly. This reduces the risk of malfunctions during operation.
-
Maintain a Clean Workspace: Ensure the area around the tire machine is clear of tools, debris, or other obstacles. A clean workspace minimizes the risk of tripping or interference with machine operation.
-
Follow Manufacturer Guidelines: Adhere to the operating manual for your specific tire machine. Each model may have unique instructions and safety features, so familiarize yourself with them to prevent accidents.
-
Work Methodically: Rushing through the process can lead to mistakes. Take your time to properly position the tire, ensure correct clamping, and monitor the machine’s operation throughout. This methodical approach protects both you and the equipment.
-
Adjust Speed During Critical Moments: When using two-speed machines, reduce speed during high-stress moments, such as final placement of the bead over the rim edge, to maintain control and prevent damage.
Maintenance of Tire Changers for Longevity
Keeping your tire changer in top shape is crucial if you want it to last. Start by cleaning it regularly, especially the areas that see the most action like the turntable and bead breaker. Dust and debris can build up quickly and if ignored cause wear or even damage over time. A quick wipe down after each use can save you from bigger problems down the road.
The tire changer has a water separator and oiler factory installed. Don’t skip on lubrication. Check, refill, and maintain the oiler on a weekly basis and apply a manufacturer-recommended lubricant to moving parts to keep them working smoothly and prevent unnecessary friction. The machine runs on compressed air, so you should drain the water separator daily. This stops moisture from getting into the system which can lead to rust and other internal damage.
It’s also a good habit to monitor the air pressure. Running the machine at the wrong pressure either too high or too low can lead to inefficiency or strain on its components. Following the settings recommended by the manufacturer is the best way to keep things running smoothly.
Finally, make time for regular checkups. If you notice parts like the bead breaker pads or clamps wearing out, replace them right away. Professional servicing done periodically can also help you catch potential issues before they turn into major repairs.
Conclusion
This guide has covered the basics from understanding the types of tire changers to proper maintenance practices that can extend the life of your equipment. Because knowing how to use and care for a tire machine isn’t just about getting the job done, it’s about doing it safely and efficiently.
By taking the time to prepare, following safety guidelines and staying on top of maintenance, you’ll get better results and save yourself from unnecessary headaches. Whether you are working in a busy shop or maintaining your own tools, these practices will help you stay ahead of the game.
At the end of the day, attention to detail and good habits make all the difference. When you combine knowledge with care you are set up for success in every tire changing task.
How to Choose the Right Tire Balancing Machine for Your Shop
How Alignment Services Increase Customer Retention for Tire Shops
The ROI of 3D Wheel Alignment Systems
Hands-On Innovation: How EZ-Toe™ Simplifies Toe Adjustments
Wheel Alignment: A Complete Guide
How to Choose the Best Tire Machine for Your Shop
Symmetric vs Asymmetric Lift: The Key Differences Every Shop Should Know


 Wheel Aligners
 Wheel Balancers
 Tire Changers
 Lifts
Lifts


